


Build Your Own Galvanised Pull-Up Bar
What you will need...
All Tube and Clamps in 33.7mm
- 4 at 2000mm | 4 x 10⁴ | 2 x 133
- 3 at 1500mm | 4 x 125 | 2 x 167
- 4 at 750mm | 4 x 129
- 1 x Allen Key
- Tape Measure
Product Summary
An extremely sturdy adjustable height training bar which is height adjustable from 70cm to 200cm.
Base dimensions are 203cm long by 155cm wide.
Weight limitation 95kg.
An excellent home training bar for all ages to enjoy. Perfect for indoor or outdoor garden activity.
This Galvanised Pull Up Bar is quick and easy to assemble, all that is required is an Allen key (included) and a hammer. Instructions are also included.
Delivered in component parts for easy access.
Constructed from galvanised steel for permanent outdoor use/storage.
Central base supports are on the sides to reduce risk of landing on, but should ideally be used with a mat.
If you require a bespoke size, please feel free to message your requirements to us as we can build a kit in any size or style. Please Email us with your requirements on sales@themetalstore.co.uk.

Parts
Step by Step Guide

Step 1
Whenever possible, it’s always best to build this unit on a nice flat surface and in a location that gives you a decent sized area to work in.
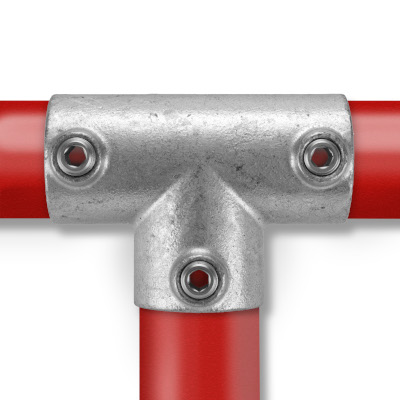
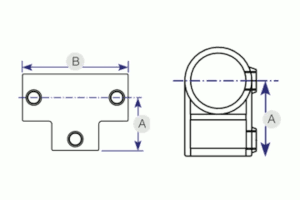
The first thing you need to do is to lay 2 x 2m tubes down parallel (roughly 1.5m apart) and place a 104 clamp on each tube centrally. When it comes to adding the 104 clamps it’s a good idea to get these aligned as centrally on the tube as you can. This will ensure that the training bar is as well balanced as possible.
Step 2
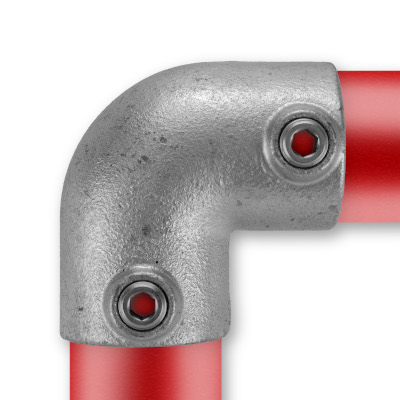
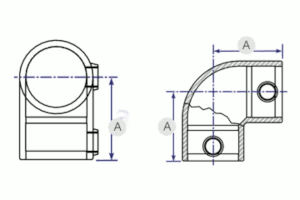
Next up, slide 2 x 129 clamps on each 2m tube and attach all four 125 clamps on to the ends of the 2m tubes ensuring they are pointing inwards.
The 104 clamps in the centre of the tubes should now be turned to point upwards.


Step 3
It’s now time to finish constructing the base section.
All you need to do is to take 2 x 1.5m tubes and join the base of the frame together by inserting the tubes into the 125 clamps.
Step 4
Take the remaining 2m tubes and stand them vertically inside the 104 clamps and tighten the grubscrews.
You should be fine doing this by yourself but if you have a helper then great!

Step 5
It’s now time to secure the vertical tube to the base section.
Place the 167 clamp onto the 2m vertical tube and position it 475mm from the top of the 104 clamp then repeat the process at the other side.
Tighten the grubscrews and make sure everything lines up and is nice and secure.
Step 6
You’re almost done as it’s now time to add the horizontal bar.
Take the remaining 104 clamps and slide one on each of the vertical 2m tubes and connect together with the remaining 1.5m tube. This bar can then be adjusted to your required height.
Make sure you use your tape measure to ensure the 104 clamps are positioned at the same height on each of the horizontal tubes.

Step 7
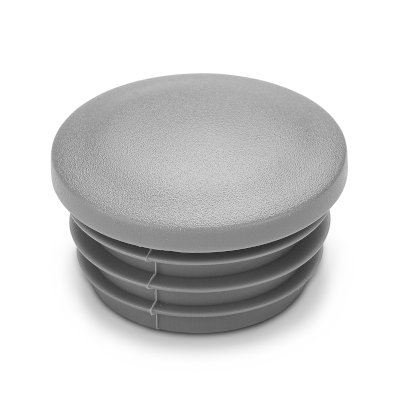
Finally attach the 133 plastic stop ends to the top of the 2m vertical tubes and you’re ready to go.
IMPORTANT: Before use please check all grubscrews are tightly secured to the tubes!
And there you have it, your training bar is ready to use! The base should be nice and sturdy as long as it’s on a decent flat surface but you can always secure it to the floor for that extra bit of safety and security. If you’re not sure on what to use then the team at The Metal Store are always happy to help, simply drop us an e-mail or give us a call.
Also, why not get creative and add some extra sections to the training bar to make your workouts even better. You can check out our image gallery to see some of the great ways people have used tube and clamp systems to create their own cost effective gym equipment and we’d love to see your kit in place so please feel free to send us any pictures you have.